How to run a WordPress blog on AWS EC2 instance (Apache webserver, Mariadb database server, PHP 8.1 and Amazon Linux2)
There are many ways to install and run WordPress using AWS resources. You can use AWS lightsail to run your WordPress blog or an EC2 instance of your preferred size. There are also some machine images that include a WordPress installation. In this post, we will discuss how to install and run WordPress on an AWS EC2 instance with a mariadb database. If you want to avoid the heavy work, you can use a wordpress image like the one provided by Bitnami. If you like to do things yourself and want every part of the installation to be according to your choice, you can follow the rest of this tutorial.
As a part of creating our wordpress blog on AWS EC2 instance, we will install the following things:
- Apache webserver
- WordPress latest version
- Mariadb 10.5 database server
- PhpMyAdmin
- Php 8.1
The installation process begins with creating an AWS EC2 instance of your preferred size. If you are planning to start out your blog, you can start with a small instance that is free tier eligible. T1 and t2 micro are free tier eligible instances yet sufficient when you are just starting out a blog from scratch (t1 and t2 micro are free tier eligible but not recommended for wordpress and you must select a somewhat larger instance if you expect your audience to grow soon). If you plan to move an existing bog with sizeable audience, you can go for a larger instance based on your need. I will not discuss how to create an AWS instance in this post, which can be easily done using the AWS console or AWS CLI. Those who do not have the CLI installed can also do it through the console. I have described in other posts how to create AWS instances using either the AWS management console or the AWS CLI.
Now, after creating an instance, we can start the process of installation. If you have an existing blog, you are planning to move to AWS, you can do that using a migration plugin with ease. All you need is to take a backup using the plugin and then later upload it to your new wordpress installation using the same plugin. You can also use SFTP to move your blog.
Those who are starting a fresh wordpress blog, will need to familiarize themselves a bit with the Apache server (or Nginx). We are using Apache web server and Amazon Linux 2 machine image for this one. To begin the installation process, you need to connect to your instance using SSH. We can start the installation, once you have connected to your instance. The entire process can take around an hour or so. However, you would not need to install everything at one go. If you like you can carry out the entire work in stages whenever you have free time. You can divide the entire task into stages like installing web server, WordPress, Php 8.1 and so on. Let’s begin with the installation of Apache httpd server which is required to run our WordPress blog.
Install Apache webserver, PHP and Mariadb on your EC2 instance
When installing, the Apache webserver, you can also install PHP 8 or 8.1 and the preferred version of Mariadb database.
Connect to Instance and associate an Elastic IP
Connect to your instance through SSH and first run the updates. (Remember I have used Amazon Linux 2 AMI for my EC2 instance. You have more options like Debian and Ubuntu also.) Before moving on to installation, first get an elastic ip for your instance and associate it. Go to Elastic Ips on EC2 dashboard in the left sidebar and click on allocate IP. Once the IP is allocated, click on associate IP and associate it with the new EC2 instance you have created. Why we are doing this will become clear in the later stages.
After associating the Elastic IP, connect with your instance using SSH. Our first step will be to update the instance to get the latest bug fixes and security updates.
Run updates and install PHP and the Mariadb database
Run the following command for update:
$ sudo yum update -yIf all the packages are already up to date, the system will update you. In the next step, we will install PHP and Mariadb. In the following command, you can change the version of PHP and Mariadb as per your preference. We are installing php 8.1 and Mariadb 10.5 for our wordpress blog. The following command can install multiple software packages and dependencies at the same time. We will install php and the database together.
$ sudo amazon-linux-extras install php8.1 mariadb10.5The installation lasts just a few minutes and you get the installation completed message when it ends and a list of packages enabled on your instance and the ones available for installation.
Take a look at the list below, which is a part of the output:
50 selinux-ng available [ =stable ]
_ php8.0 available [ =stable ]
52 tomcat9 available [ =stable ]
53 unbound1.13 available [ =stable ]
54 mariadb10.5=latest enabled [ =stable ]
55 kernel-5.10=latest enabled [ =stable ]
56 redis6 available [ =stable ]
57 ruby3.0 available [ =stable ]
58 postgresql12 available [ =stable ]
59 postgresql13 available [ =stable ]
60 mock2 available [ =stable ]
61 dnsmasq2.85 available [ =stable ]
62 kernel-5.15 available [ =stable ]
63 postgresql14 available [ =stable ]
64 firefox available [ =stable ]
65 lustre available [ =stable ]
66 php8.1=latest enabled [ =stable ]
You can see that the packages we just installed, are now enabled and you also have php 8 available and php 8.1 enabled on your instance apart from mariadb 10.5 and Kernel 5.10.
Begin Apache httpd web server installation
In the next step, we will install the Apache httpd web server. The following command will install the Apache httpd webserver on your instance.
$ sudo yum install -y httpdNow, the Apache server is installed on your instance. Around half of our work is done and the remaining parts include wordpress and phpMyAdmin. However, we need to do a few things to complete our Apache webserver installation. First, we will start the Apache web server with the following command:
$ sudo systemctl start httpdNow, our Apache server is installed and running. You can check the status of your httpd webserver using the following command:
$ sudo systemctl status httpdThe output will look like the following showing that Apache server is active and running:
- httpd.service – The Apache HTTP Server
Loaded: loaded (/usr/lib/systemd/system/httpd.service; disabled; vendor preset: disabled)
Drop-In: /usr/lib/systemd/system/httpd.service.d
└─php-fpm.conf
Active: active (running) since Fri 2023-03-17 07:05:48 UTC; 49s ago
Docs: man:httpd.service(8)
Main PID: 4014 (httpd)
Status: “Total requests: 3; Idle/Busy workers 100/0;Requests/sec: 0.0612; Bytes served/sec: 207 B/sec”
CGroup: /system.slice/httpd.service
├─4014 /usr/sbin/httpd -DFOREGROUND
├─4021 /usr/sbin/httpd -DFOREGROUND
├─4022 /usr/sbin/httpd -DFOREGROUND
├─4023 /usr/sbin/httpd -DFOREGROUND
├─4024 /usr/sbin/httpd -DFOREGROUND
├─4025 /usr/sbin/httpd -DFOREGROUND
└─4067 /usr/sbin/httpd -DFOREGROUND
Mar 17 07:05:47 ip-172-31-15-66.ec2.internal systemd[1]: Starting The Apache HTTP Server…
Mar 17 07:05:48 ip-172-31-15-66.ec2.internal systemd[1]: Started The Apache HTTP Server.
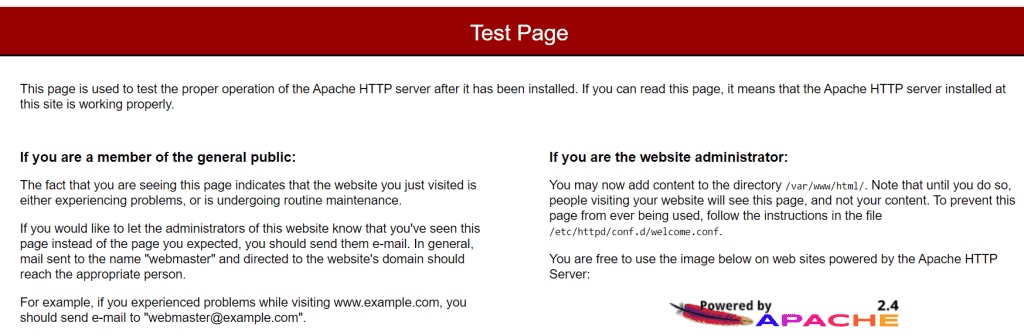
Once our Apache webserver is up and running, we can also confirm it at the front end. Copy the elastic IP (public IP) you associated with your instance and then paste it in your browser. If the Apache web server has been correctly installed, you will see this test page. If you can see a test page like in the image below, you have successfully installed the Apache web server on your AWS EC2 instance. If you see the status of Apache web server as active and running but the test page does not show when you browse using the Public Ip, you must check the inbound rules in your security group and make sure, you have allowed port 80.
Now, we can configure our Apache httpd webserver to start with each system boot using the following command:
$ sudo systemctl enable httpdNow, you have started your server and enabled it to start with each system boot.
We need to modify the ownership and permissions of our root folder on the Apache webserver to allow the default user (EC2 user, unless you created a different user).
Set file permissions for the Apache httpd web server:
- Add the default user to the apache group
$ sudo usermod -a -G apache ec2-user- Now, we need to logout to refersh our permissions and include the new apache group. Just type exit and enter.
- Login once again. To verify that the apache group exists, just type groups and hit enter. It will give the following output: $ec2-user adm wheel systemd-journal
- Now, we can change the group ownership of the /var/ww folder and its contents to the apache group using the following command:
$ sudo chown -R ec2-user:apache /var/www- Now add group write permissions to /var/www and its subdirectories using the following command:
$ sudo chmod 2775 /var/www$ find /var/www -type d -exec sudo chmod 2775 {} \;- We also need to add group write permission to the files in the /var/www folder and its subdirectories using following command:
$ find /var/www -type f -exec sudo chmod 0664 {} \;At this point, you have modified the group permissions so that the default user (ec2-user) can add, delete and edit files in the document root var/www. For example, if you need to add a static website or upload a file to your root folder, now you can do it as the default user or as another user who is a part of the Apache group.
The first part of our installation process is complete and we will move onto the second stage that includes downloading wordpress latest version and installing phpMyAdmin.
How to download and install WordPress on EC2 instance:
To install the latest version of wordpress, we need to download and unzip the package. The latest version of wordpress is always available at the following link: https://wordpress.org/latest.tar.gz
To download the latest wordpress version, run the following command:
$ wget https://wordpress.org/latest.tar.gzIt will download the latest.tar.gz package and save it. The output looks like the following:
[ec2-user]$ wget https://wordpress.org/latest.tar.gz
–2023-03-17 07:40:07– https://wordpress.org/latest.tar.gz
Resolving wordpress.org (wordpress.org)… 198.143.164.252
Connecting to wordpress.org (wordpress.org)|198.143.164.252|:443… connected.
HTTP request sent, awaiting response… 200 OK
Length: 22751086 (22M) [application/octet-stream]
Saving to: ‘latest.tar.gz’
100%[=================>] 22,751,086 42.9MB/s in 0.5s
2023-03-17 07:40:08 (42.9 MB/s) – ‘latest.tar.gz’ saved
Now, we have the installation package and need to unzip and unarchive it. The unzipped package will be saved to a folder named wordpress
Just run the following command :
$ tar -xzf latest.tar.gz
You will see no output on successful completion. If you remember, we have installed the mariadb database in the first step. The database is necessary for storing your blog information like blog posts, comments, users etc. Now, we will start the database and add a user who can write and save to the database. To start the mariadb database server, run the following command:
$ sudo systemctl start mariadbYou will again see no output. We have started our database and need to secure it before moving ahead.
Run the command:
$ sudo mysql_secure_installationIt will first give the following output:
[ RUNNING ALL PARTS OF THIS SCRIPT IS RECOMMENDED FOR ALL MariaDB SERVERS IN PRODUCTION USE! PLEASE READ EACH STEP CAREFULLY! In order to log into MariaDB to secure it, we’ll need the current password for the root user. If you’ve just installed MariaDB, and haven’t set the root password yet, you should just press enter here.]
Just follow the instructions. We have not secured our database with a password yet, so just press enter. Answer yes, when asked if you wanted to change the root password. Enter a new strong password and save it somewhere safe since we will need it in the next step to login to the database.
Now, your database password is set or your database is secured with a password. In the next steps, the system will ask you if you want to remove anonymous users, remote login and the test database which is a part of the mariadb installation. You can answer yes since you do not need them. Type Y when prompted to reload the privilege tables. If you plan to use the mariadb database server later, you can stop it for now and restart it later. Here are the commands to stop and start it.
$ sudo systemctl stop mariadb$sudo systemctl start mariadbIf you want to enable the database server to start at every boot, you can do it with the following command:
$sudo systemctl enable mariadbSince we plan to install and start using our wordpress blog right away, we do not need to stop it. However, you can if you plan to do the rest of the installation later.
Now, we will login to the database server using the password, we created. Run the following command:
$ mysql -u root -pThe system will prompt you to enter the password. Enter the strong password you created to secure your database server. When you enter the password (remains invisible), you will receive a welcome message.
“Welcome to the MariaDB monitor. Commands end with ; or \g.
Your MariaDB connection id is 12
Server version: 10.5.18-MariaDB MariaDB Server
Copyright (c) 2000, 2018, Oracle, MariaDB Corporation Ab and others.
Type ‘help;’ or ‘\h’ for help. Type ‘\c’ to clear the current input statement.”
We are now logged into the database. Now, we can create a user and password so that wordpress can communicate with our database. Later, we will need to add the credentials to our WP-config file. Run the following command but first make necessary changes to it.
$ CREATE USER 'wordpress-user'@'localhost' IDENTIFIED BY 'a_strong_password';In the above command, you can substitute the wordpress-user with another name for your user and a strong password (where it says ‘a-strong-password) to safeguard your database. Now, store the password you have just created in a safe place.
Upon successful completion you receive the following message.
Query OK, 0 rows affected (0.001 sec)
If there is any error in the command, the system will tell you. Remember mariadb commands end with ; or \g.
We have created a user and password for our database but we also need to create a database in which our blog information will be stored. Run the following command, substituting the name of the database with another meaningful one per your choice.
$CREATE DATABASE `wordpress-db`;Again you will receive the same output as in the previous step.
At this point, we have created a database user, password and a database.
- WordPress user: wordpress-user
- Password: **********
- WordPress database: wordpress-db
Now, we need to grant all privileges to this user with the following command:
$ GRANT ALL PRIVILEGES ON `wordpress-db`.* TO “wordpress-user”@”localhost”;
Here, substitute the name of the database and the wordpress user you just created in the above command and run it. Suppose you named your database – example-db and your user example-user, the command will look like:
$ GRANT ALL PRIVILEGES ON `example-db`.* TO “example-user”@”localhost”;
Again, you will receive the same output as in the previous step.
All you need to do right now is to flush the privileges so that the changes are applied immediately. Run the command:
$ FLUSH PRIVILEGES;
Now, exit the mysql client by typing exit and hit enter. You will receive a Bye from Mariadb.
So, we have set the credentials that WordPress needs to work with the database. However, we need to configure WordPress before making it work. To do that, we will need to make changes to the WordPress configuration file or the wp-config.php file.
You can take a break if you want. All that remains to be done is to customize the wordpress configuration file and we will install phpMyAdmin. Following that, we will check out our wordpress dashboard, apply our custom domain and then add ssl before our blog is fully operational. So, most of the heavy work is done now.
Customize the WordPress Configuration File
Every wordpress installation includes a sample wordpress configuration file, which can be customized to create a wordpress blog. The wordpress configuration file or the wp-config-php file includes your database credentials and the authentication unique keys and salts which are meant to protect your wordpress installation and database.
We will create a copy of the sample wp-config.php file for our wp-config.php and the original sample file will remain there as a backup.
To copy the file run the following command:
$ cp wordpress/wp-config-sample.php wordpress/wp-config.phpNow, you can edit the wp-config file you have created using either the nano or vim editor.
$ sudo nano wordpress/wp-config.phpIn the wp-config.php file, you will find the following values:
define(‘DB_NAME’, ‘wordpress-db‘);
define(‘DB_USER’, ‘wordpress-user‘);
define(‘DB_PASSWORD’, ‘your_strong_password‘);
You will need to replace the values with your own. Enter the name you used for creating your wordpress database, user and the strong password, you saved previously.
Now comes the authentication keys and salts part. Scroll down to find this section inside the wp-config.php file. It looks like the following:
/**#@+
* Authentication unique keys and salts.
*
* Change these to different unique phrases! You can generate these using
* the {@link WordPress.org secret-key service}.
*
* You can change these at any point in time to invalidate all existing cookies.
* This will force all users to have to log in again.
*
* @since 2.6.0
*/
define( ‘AUTH_KEY’, ‘put your unique phrase here’ );
define( ‘SECURE_AUTH_KEY’, ‘put your unique phrase here’ );
define( ‘LOGGED_IN_KEY’, ‘put your unique phrase here’ );
define( ‘NONCE_KEY’, ‘put your unique phrase here’ );
define( ‘AUTH_SALT’, ‘put your unique phrase here’ );
define( ‘SECURE_AUTH_SALT’, ‘put your unique phrase here’ );
define( ‘LOGGED_IN_SALT’, ‘put your unique phrase here’ );
define( ‘NONCE_SALT’, ‘put your unique phrase here’ );
To fill the values for these keys and salts, we will need to generate a random set of key values. When you have filled the values they will look like the following. The values below are for example only:
define(‘AUTH_KEY’, ‘ #U$$+[RXN8:b^-L 0(WU_+ c+WFkI~c]o] bHw+)/Aj[wTwSiZ<Qb[mghEXcRh-‘);
define(‘SECURE_AUTH_KEY’, ‘Zsz._P=l/|y.Lq)XjlkwS1y5NJ76E6EJ.AV0pCKZZB,*~*r ?6OP$eJT@;+(ndLg‘);
define(‘LOGGED_IN_KEY’, ‘ju}qwre3V*+8f_zOWf?{LlGsQ]Ye@2Jh^,8x>)Y |;(^[Iw]Pi+LG#A4R?7N`YB3‘);
define(‘NONCE_KEY’, ‘P(g62HeZxEes|LnI^i=H,[XwK9I&[2s|:?0N}VJM%?;v2v]v+;+^9eXUahg@::Cj‘);
define(‘AUTH_SALT’, ‘C$DpB4Hj[JK:?{ql`sRVa:{:7yShy(9A@5wg+`JJVb1fk%_-Bx*M4(qc[Qg%JT!h‘);
define(‘SECURE_AUTH_SALT’, ‘d!uRu#}+q#{f$Z?Z9uFPG.${+S{n~1M&%@~gL>U>NV<zpD-@2-Es7Q1O-bp28EKv‘);
define(‘LOGGED_IN_SALT’, ‘;j{00P*owZf)kVD+FVLn-~ >.|Y%Ug4#I^*LVd9QeZ^&XmK|e(76miC+&W&+^0P/‘);
define(‘NONCE_SALT’, ‘-97r*V/cgxLmp?Zy4zUU4r99QQ_rGs2LTd%P;|_e1tS)8_B/,.6[=UK<J_y9?JWG‘);
Follow this link and copy the randomly generated key values and paste them in the wp-config.php file one by one. Every time you load this page, it will generate a random set of key values.
Once you are finished editing the wp-config.php file, you can close the file and exit using ctrl + s and ctrl + x.
Select the directory to run wordpress from
Now, it is the time to select the folder from which you will run your wordpress website. You can run it from the root folder /var/www/html or from a subfolder like /var/www/html/wordpress/public_html or /var/www/html/wordpress/blog.
If you want to run it from the root folder, the copy the contents of the wordpress installation directory to the root folder.
With the below command, we will copy the contents of the wordpress folder to the root folder:
$ cp -r wordpress/* /var/www/html/wordpress/If you want to run it from a subfolder like /var/www/html/wordpress/blog, first create that subdirectory. And then run the command to copy the contents of wordpress installation directory.
$ mkdir /var/www/html/wordpress/blog$ cp -r wordpress/* /var/www/html/wordpress/blogOnce you have copied the wordpress files and subfolders (like wp-config.php, wp-login.php, wp-content, wp-includes) to your root folder, you can make changes to any of these files later from the same location (root folder – /var/www/html).
Enable the use of .htaccess file:
We are nearly all set and most of the heavy work is behind us.
At this point, to start using our wordpress website, we need to add a custom domain. However, before that, we will need to make a few changes to enable the use of .htaccess files which is required for wordpress permalink settings to work.
Go to the Apache configuration file or httpd.conf file and replace AllowOverride None with AllowOverride All.
You can open the httpd.conf file for editing using the following command:
$ sudo nano /etc/httpd/conf/httpd.confInside this file, you can find the section <Directory /var/www/html> after scrolling a bit. Change AllowOverride None to AllowOverride All in this section and then save and exit the file. Now, you can use the .htaccess file on your server which is also useful in terms of caching and compression.
Custom domain name and blog configuration:
We need to add a custom domain name for our blog or we can finish wordpress installation using the public ip. However, you still need a domain name to make your wordpress blog publicly accessible. You must already have bought the domain name, if you are planning to create a new blog or you can start a subdomain on a separate server. If you are just testing wordpress on EC2 instance, you can use a subdomain of your existing domain. For example, if you plan to run a forum or support website for your main website, you can also do that. In the current example, instead of a new domain, I will use a subdomain of my existing website to create a sample wordpress blog. I am going to use test.cheshnotes.com as the domain for my wordpress blog running on an EC2 t2micro instance with a mariadb database server.
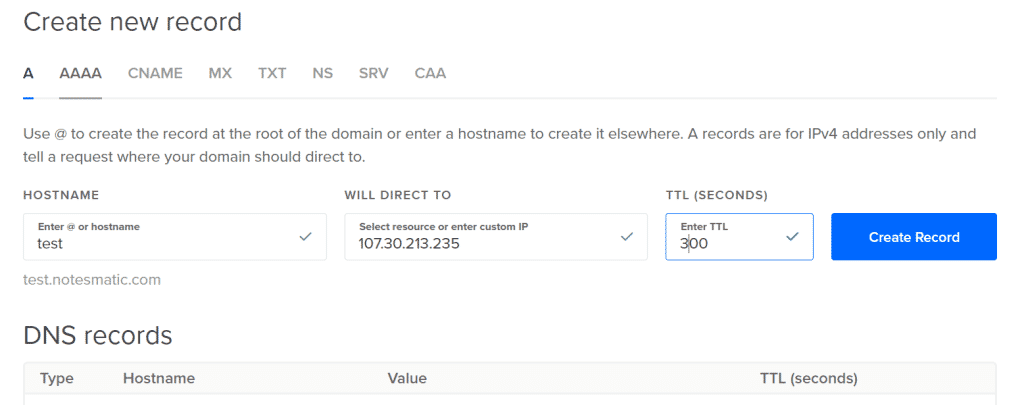
To use a custom domain name for the blog, we first need to create the necessary DNS records. You will need only the A records for the domain you want to run. Add A records for both www and non www versions and if you plan to create a subdomain, just add an A record for the subdomain like you do for www.
Initially, select a low TTL like 300 seconds for the DNS record you create. Check out the image below:
Now, you can go to your domain to finish wordpress installation. If you see a database connection error, then check your database user and password in the wp-config.php file. If you think there was an error or you forgot to save the password, you can create a new user and password and add it to the wp-config.php file located at /var/www/html/wordpress/wp-config.php (given you installed wordpress in root folder). It will not be a problem for you. Database connection errors, especially in case of new installations are mostly a result of wrong credentials and can be fixed easily. Another reason of database connection error can be that your database server is not active and running. To fix that, you must simply start the mariadb server using SSH.
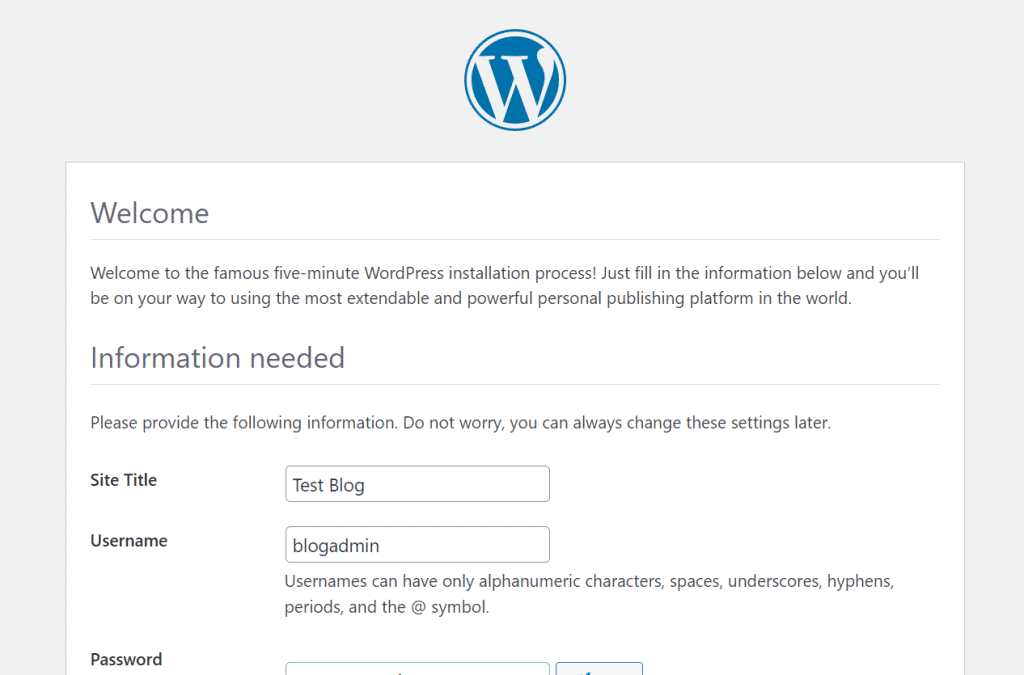
Now, if you visit the custom domain, you will be welcomed by a wordpress page that will ask you to provide a site title, a user name and a password for accessing the wp-admin dashboard. Like in the current example, I have used the domain, test.cheshnotes.com. Once you have provided the required information, click on install wordpress. You will receive the success message that wordpress has been installed.
Now, login using the username and password you just created. My newly created wordpress blog does not have any content, which I will add later. Right now, it needs a beautiful theme and ssl. You can start installing the plugins and theme if you like.
One more part that remains apart from the ssl (since our site needs to be accessible on https) is the phpMyAdmin so that we can login to the database and check out.
A speed test with default configurations
Before, we move on to giving our installation process the final touches, I would like to share something with you guys. I have my test blog here up and running from test.cheshnotes.com. It is hosted on a t2 micro instance (free tier) with Apache httpd web server created using the above process for wordpress installation. It does not yet have ssl enabled and the only post on the blog is the default Hello World post. The default theme twenty twenty three is active on the website and the site has Hello Dolly and Akismet anti-spam plugins installed and in disabled mode. I have not installed any plugins and neither have I enabled Gzip or CDN. Well, I decided to check out how fast the blog loads with the default wordpress theme and without any speed enhancements like GZIP, caching, CDN and other enhancements.
The speed score on GTMetrix was 100% for performance and 93% for structure. You can check out on the link below. After I have finished the installation and added the SEO and caching plugins and enabled GZIP, I will test blog speed again. However, you can check the blog’s speed report from GTMetrix through the following link with the default installation and without any performance configurations or changes.
https://gtmetrix.com/reports/test.cheshnotes.com/7UUy6ZNi/
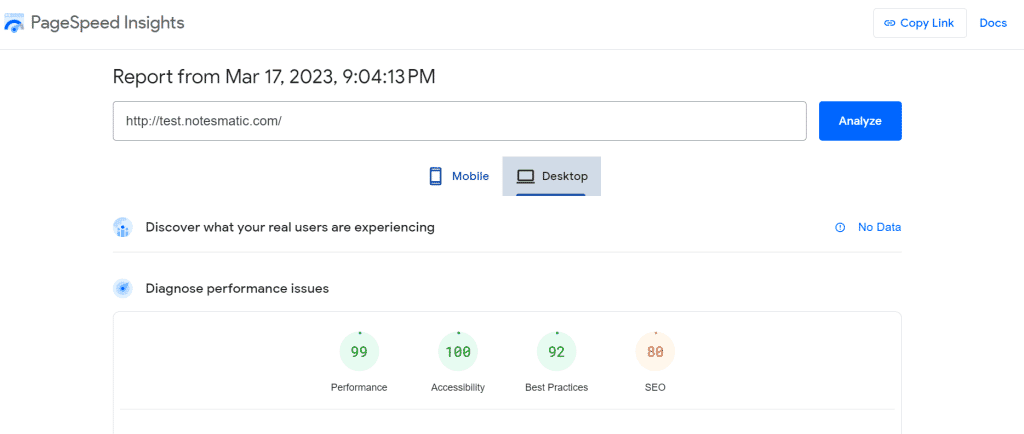
Google pagespeed score of the blog for both laptop and mobile screens was 99. Absolutely great when I have not made any modifications and using the default wordpress theme.
If I check with generatepress or Astra, I know the speed can be even better. Pingdom score of the blog was 90 with a page size of 103 kb (uncompressed).
https://tools.pingdom.com/#61bc0afa60400000
Things look really good at the outset. The admin dashboard of wordpress loads very fast. Now, let’s move on to the last steps of our configuration of wordpress.
PHPMyAdmin and SSL for wordpress blog:
I have left the ssl part for the last, since I want to make sure everything including the database runs fine and for that, we will take a look inside the database and at the end secure the blog with ssl. So, let’s first install PhpMyAdmin. To install it, we will need to install the required dependencies first.
Install the Dependencies by running the following command:
$ sudo yum install php-mbstringAnswer Y when prompted to and at the end of the output, you will see the following:
Running transaction
Installing : oniguruma-5.9.6-1.amzn2.0.4.x86_64 1/2
Installing : php-mbstring-8.1.14-1.amzn2.x86_64 2/2
Verifying : php-mbstring-8.1.14-1.amzn2.x86_64 1/2
Verifying : oniguruma-5.9.6-1.amzn2.0.4.x86_64 2/2
Installed: php-mbstring.x86_64 0:8.1.14-1.amzn2 Dependency Installed: oniguruma.x86_64 0:5.9.6-1.amzn2.0.4
Complete!………………..
The system has installed the php-mbstring corresponding to our php version.
Now, we will restart the Apache httpd webserver.
$ sudo systemctl restart httpd
Install the latest package of PhpMyAdmin, which can be done by downloading the package from the phpMyAdmin downloads page. Check out the available downloads on the following link: https://www.phpmyadmin.net/downloads/
From here, select the version, you want to download, right click on it and copy the link address. Now enter the root folder using the following command:
$ cd /var/www/htmlRun the following command with ‘wget’ followed by the link you copied from phpMyAdmin downloads page (version is 5.2.1):
$ wget https://files.phpmyadmin.net/phpMyAdmin/5.2.1/phpMyAdmin-5.2.1-all-languages.tar.gzIn less than a second, the system will have downloaded the package. You will see an output like the following:
–2023-03-17 16:45:35– https://files.phpmyadmin.net/phpMyAdmin/5.2.1/phpMyAdmin-5.2.1-all-languages.tar.gz
Resolving files.phpmyadmin.net (files.phpmyadmin.net)… 89.187.177.17, 156.146.36.24, 2a02:6ea0:c400::12, …
Connecting to files.phpmyadmin.net (files.phpmyadmin.net)|89.187.177.17|:443… connected.
HTTP request sent, awaiting response… 200 OK
Length: 13041998 (12M) [application/octet-stream]
Saving to: ‘phpMyAdmin-5.2.1-all-languages.tar.gz’
2023-03-17 16:45:35 (64.1 MB/s) – ‘phpMyAdmin-5.2.1-all-languages.tar.gz’ saved.
According to the above output, the system has saved the package as ‘phpMyAdmin-5.2.1-all-languages.tar.gz’. You will need it in the next step.
Now, you need to create a phpMyAdmin folder and extract the package to it. Run the following command:
$ mkdir phpMyAdmin && tar -xvzf phpMyAdmin-5.2.1-all-languages.tar.gz -C phpMyAdmin --strip-components 1The extraction process will take no more than a minute. Once the extraction is complete, you can delete the ‘phpMyAdmin-5.2.1-all-languages.tar.gz’ file by running the following command.
$ rm phpMyAdmin-5.2.1-all-languages.tar.gzIf the Mariadb server is not running, you can start it now. In case, you don’t know, check its status using the below command:
$ sudo systemctl status mariadbThe out put will show if mariadb server is active or inactive.
For example, the output below shows that the Mariadb 10.5 database server is active and running:
[ec2-user] $ sudo systemctl status mariadb
- mariadb.service – MariaDB 10.5 database server
Loaded: loaded (/usr/lib/systemd/system/mariadb.service; disabled; vendor preset: disabled)
Active: active (running) since Fri 2023-03-17 07:46:11 UTC; 9h ago
Docs: man:mariadbd(8)
https://mariadb.com/kb/en/library/systemd/
Process: 4448 ExecStartPost=/usr/libexec/mariadb-check-upgrade (code=exited, status=0/SUCCESS)
Process: 4286 ExecStartPre=/usr/libexec/mariadb-prepare-db-dir %n (code=exited, status=0/SUCCESS)
Process: 4262 ExecStartPre=/usr/libexec/mariadb-check-socket (code=exited, status=0/SUCCESS)
Main PID: 4394 (mariadbd)
Status: “Taking your SQL requests now…”
CGroup: /system.slice/mariadb.service
└─4394 /usr/libexec/mariadbd –basedir=/usr
If it is inactive, then you can start it using:
$ sudo systemctl start mariadbWe have everything installed at this stage. Now, if you want, just login to the database using phpMyAdmin and take a look around. To access your database through phpMyAdmin, copy your instance’s public DNS address and paste it into the browser and add /phpMyAdmin/ (the folder where you installed phpMyAdmin) at the end.
For example:
Or just your domain followed by/phpmyadmin/ like:
https://www.example.com/phpmyadmin
It will open the phpMyAdmin page and you can login using the database credentials (the ones you stored in wp-config.php file).
Once, you are logged in click on the database and open it to check out the tables. If you open the wp_options table, you will see the site url, homepage url and blogname at the top like in the image below. The domain I am using for this wordpress installation is test.cheshnotes.com
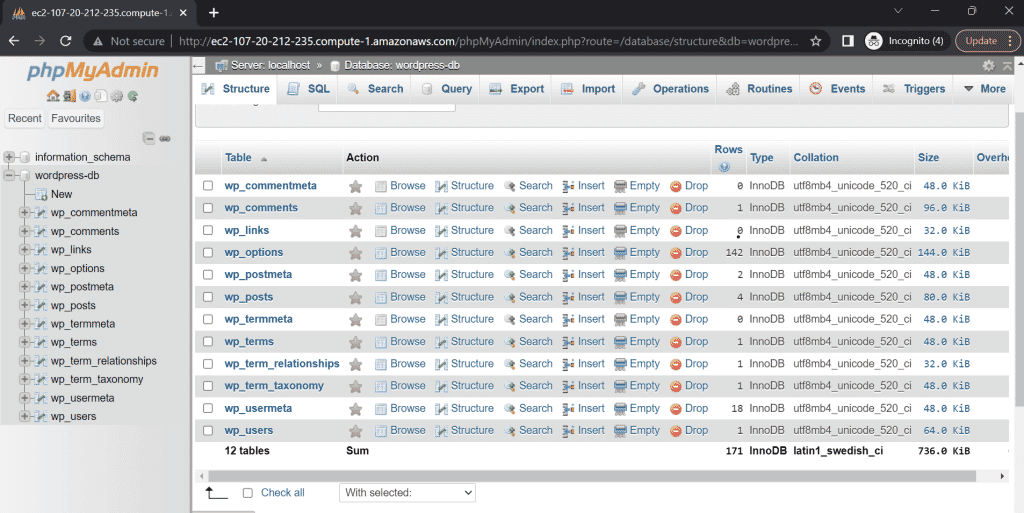
12 tables in the database.
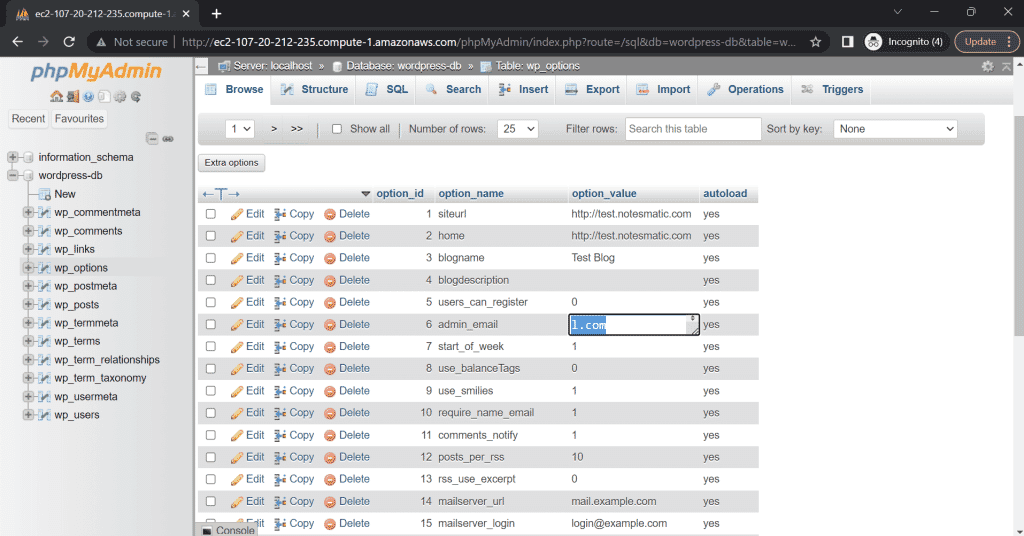
Look inside the wp-options table for site url and home page url.
In this way, you can verify the status of your database by looking into it and checking out the tables. You have a fully functional wordpress blog online waiting for content and the necessary plugins. However, a small thing still remains to be done. Yes, the ssl part. Installing SSL is easy; a three-step process. However, we need to make a few changes before installing and running certbot.
We need to have a Vhost file and a server listening on port 80 for the ssl. The certbot will look for these things which are essential for getting the ssl certificate.
Run the following command replacing the domain with your own domain name:
$sudo nano /etc/httpd/conf.d/domain.conf
Like:
$ sudo nano /etc/httpd/conf.d/test.cheshnotes.com.confAdd the following content to it (paste with necessary edits). Replace example.com with your domain name for ServerName and ServerAlias.
<VirtualHost *:80>
ServerAdmin admin@webserver1.com
ServerName example.com
ServerAlias www.example.com
DocumentRoot /var/www/html
ErrorLog logs/error.log
CustomLog logs/access.log combined
</VirtualHost>
Now, save it, close and exit with ctrl + S and Ctrl + X (or Ctrl X and Y and enter).
Important Note: If you want to host more than one blogs on the same server, you will need to add separate vhost files for each in the manner outlined above. You can create a separate folder as document root for your other website. Suppose, I am hosting example.com and newblog.com on the same server, I can host them by creating two folders in /var/www – /var/www/example and /var/www/newblog. You can upload your content for each website to the corresponding root folder and add the root folder for each one as its documentroot in the vhost file for the respective blogs. In the above Vhsot sample file, you can see the document root is /var/ww/html which can be different according to your choice. It must be the same folder where you installed wordpress. You can also create two different databases and two database users for the two blogs and configure each one in the same manner separately. You can also add ssl cretificates to all websites hosted on the same server at one go.
Install and Run Certbot
Now, to get the ssl certificate, we will install and run the certbot. It is just a three step process and does not take much time.
First step: Install Amazon extras repo for Epel with the following command:
$ sudo amazon-linux-extras install epel -ySecond Step: Install certbot and the necessary dependencies.
$ sudo yum install -y certbot python2-certbot-apacheFinally, run the certbot and follow the instructions :-
$ sudo certbotYou will need to provide your email and consent to the terms of service before certbot installs ssl on your website. It will also ask you which domain names you want to activate ssl for. To select all the domains in the list, just hit enter or select the numbers like 1 2 and so on.
Once done, you will receive a congratulations message from certbot. Now, you can visit your website on https.
In the image below, you can see that I have activated ssl certificate for the test website I created.
We have successfully installed wordpress on EC2 instance with a mariadb database, and php 8.1, running on Apache web server. Nothing remains to be done and you can just start adding content and make any other necessary changes like plugins and themes. As I previously highlighted the instance is performing well in terms of speed and I will test again with some content and a few plugins and gzip enabled.
We need to enable caching and compression. Optionally, you can also add a cdn like Cloudfront cdn or Cloudflare.
(A Brief Note: If you face any permissions related difficulty while setting your blog or installing themese and plugins like wordpress unable to write to a folder or file, then do this apart from checking permissions:
$ sudo chown -R apache:apache /var/www/htmlIf you have followed the above process to install wordpress, you must remember that we set our user and group as apache. Using the above method we are setting the ownership, which will help avoid any issues. If you have a different user, replace apache with the user name and the last part is the path to your root folder. To know your user and group, you can check inside Apache configuration file located at /etc/httpd/conf/httpd.conf )
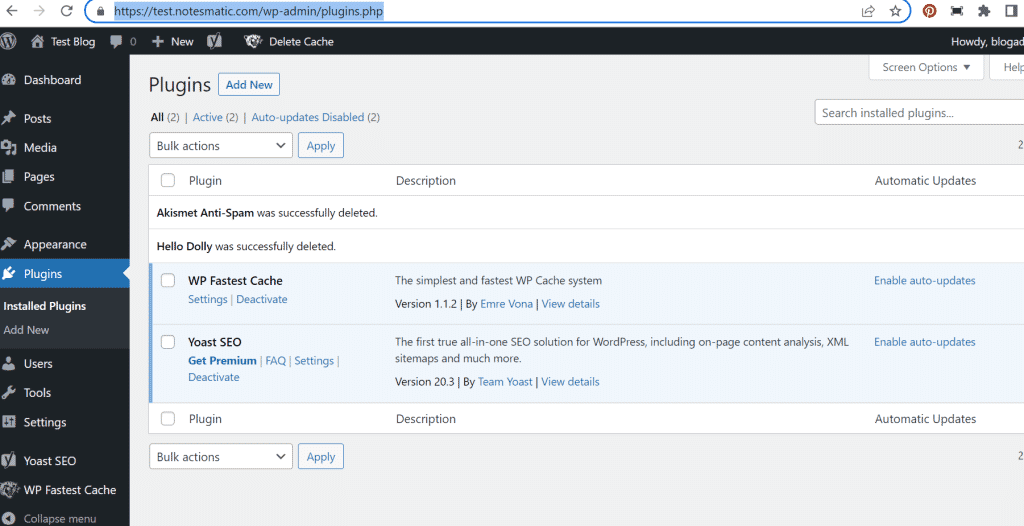
After having set my blog at test.cheshnotes.com, I first installed two plugins – Yoast SEO and Wp-fastest cache.
Again I tested for speed (without having added any content and with the same default theme) and the GTmetrix score improved sharply. Performance score was 100% and the score for structure was 98% now. LCP was down to 547 ms from 662 ms when I had tested last time. Follow the link below to check out yourself.
https://gtmetrix.com/reports/test.cheshnotes.com/ng5zgYHF/
Pingdom score also improved to performance grade A and score 98 with page size 23.4 kb and load time only 407ms (total 6 requests and test region North America- US- San Francisco).
https://tools.pingdom.com/#61bcda7378400000
Pingdom test from Europe (UK, London) also gave similar score with a load time of 444 ms and page size 23.4kb.
https://tools.pingdom.com/#61bcdadcba800000
However, the previous speed tests have been carried out without any content. So, I decided to add some content and added five random Lorem Ipsum posts of around 800 words each. I also changed the wordpress theme on the website to generatepress.
The home page has 5 posts now (no images). There are two active plugins including Yoast and WP fastest cache (caching and gzip enabled). With just these basic settings and some content, I see that there is again some improvement in load times according to the GTMetrix score. LCP was further down to 475 ms with generatepress theme having five 800 words posts. Yes, I forgot to add I am using digital ocean for DNS.
https://gtmetrix.com/reports/test.cheshnotes.com/02uujVOt/
In Pingdom test from US, the load time was only 112 ms and page size has now increased to 37.4 kb and total number of requests are 7. Performance grade has declined slightly with performance score 97 instead of 98 in the previous test.
https://tools.pingdom.com/#61bcdded6d800000
Another Pingdom test from Europe gave similar score. Performance score is 97 and page load times 453 ms which is quite good.
https://tools.pingdom.com/#61bcde6a72400000
Pingdom test.
SFTP to your EC2 Instance:
Some small problems related to your instance can be fixed by just rebooting it. If you want to SFTP to your instance and upload content using Cyberduck then create a password for the default user (ec2-user). You can do it with the command:
$ sudo passwd ec2-user
and make changes to ssh configuration file at /etc/ssh/sshd_config. In this file comment out PasswordAuthentication no and uncomment PasswordAuthentication yes. Then reboot your instance. If you want to create a new SFTP user, you can do it:
$ sudo adduser new-user
Enter a safe password when prompted to and then make the same changes to the ssh configuration file and reboot the instance.
Go back to cyberduck and open a new connection. Enter the credentials and connect. Click allow for SSH key when prompted to. Once the connection is established, go to /var/www/html or your root folder where you can find your wordpress files. You can edit the files from here.
A few last words:
The blog is performing well in terms of speed with just some basic speed tuning. I have added some content without images. If the blog grows in size, you can also try more speed tunings like changing Apache MPM, using Cloudflare or Cloudfront CDN and some type of object caching like Redis to keep your wordpress fast. I will also suggest to use a larger instance for your wordpress installation. I have used only t2.micro but this is not the recommended instance for wordpress. You should go for a larger one like t2 medium or t2 large at least. These instances will not cost much. For a starter blog, you can get a lot for $10 or $20 per month on EC2.
My test blog is still loading really fast. You must select a fast theme like Generatepress or Astra for your wordpress blog and do not add too many plugins. Keep only the plugins you need and for themes, apart from your favorite theme, also keep one default wordpress theme and you can delete the rest. AWS EC2 is fast and if you want to have a really fast loading wordpress blog, you must host it on an EC2 instance or another fast VM instance like GCP VM instance or a Digital Ocean droplet. You can see most of the process is straight forward. The wordpress download and extraction only takes 1 to 2 minutes. Apart from wordpress configuration in the wp-config.php file, the core wordpress installation does not take much time.
You can have the database of your choice. Mariadb is faster and lightweight and that’s why I decided to install it on my blog. If you are just starting out, you must use Mariadb if you want a really very fast-loading blog (since speed is a leading concern for wordpress users and a fast database is essential for a fast blog). However, if you are moving your existing blog, install the same database server as you used at your previous host. There is still a lot of scope for speed improvement like increasing the size of your instance, using a reverse proxy, Opcode caching, Redis or Memcached and other speed tweaks like mod pagespeed. You can add NGINX reverse proxy to your Apache installation if you want more security and speed.
Thanks for reading!